The en-suite has been plodding on at the speed of a stoned turtle with a gammy leg, but amazingly, finally, I actually have some progress to report! Actually, if I could just get my arse in gear and finish off the last few fiddly bits the bloody thing would actually be finished and I could move on with my life!
But anyway, I really wanted more storage in here. As I talked about in my original post about my plans for this space, the room is a decent size but an awkward shape and there isn't anywhere for free standing storage to fit. I had originally planned to make Gavin build me a full length, slim cabinet with a mirror on it onto the one small section of clear wall we have, but it didn't happen. I think it just seemed like a lot of work and he wasn't confident about how he would do it,so he wasn't enthusiastic about it, and to be honest it wasn't worth giving up hours of precious free time trying to make something that might not even work.
But then I had another idea, a BETTER idea! There was all the empty space under the sink, surely we could use that?
And can I just stick a little disclaimer about the photography in this post right here? Gavin did this all on a dark evening after the kids were in bed and I was busy with Cora, and to my amazement he actually thought to take a few pictures with his phone while he worked. So they're dark, and they're grainy, but they're helpful!
 |
| Hi Gavin! And old, ugly, in the way storage unit. |
So I tried to find a flat pack unit that would fit the space, but they were all butt ugly, and did't offer all that much storage anyway.
And then....Aldi had some lovely storage that I thought would be great in Em's room. She had recently started dressing herself but couldn't pull out the heavy drawers on the old dresser she had in there, and I realised that that was the answer! She got a lovely new unit for her room, I got her old dresser to hack up and put in my bathroom! It was solid wood and had a shape that I liked, so I thought it was worth trying to do something with it.
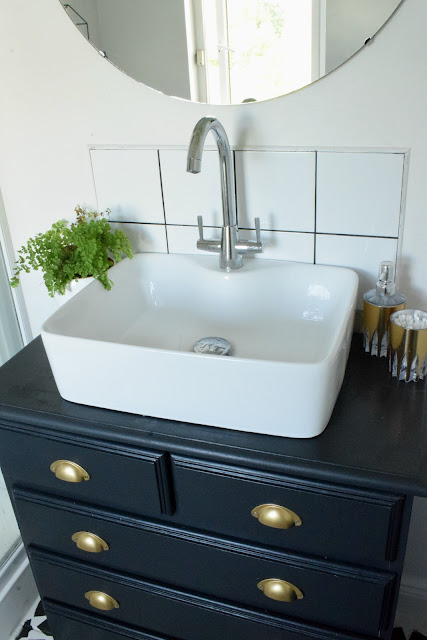
I measured it up and it fit perfectly, so I went on Ebay and found a lovely table top sink for €60 delivered and a €30 modern looking mixer tap. Both arrived in a week and in the meantime I painted the dresser with a tin of Farrow and Ball "Off Black" mixed in Fleetwood paint that I had lying around. After two coats of paint and three of matt water based varnish to protect it we added cup pulls that I had sprayed gold with Rustoleum metallic finish. The colour isn't perfect, it's got kind of a bluey-green undertone to it that I'm not a fan of, but it's not very noticable and I definitely wasn't going to buy more paint and re-do it so it's staying.
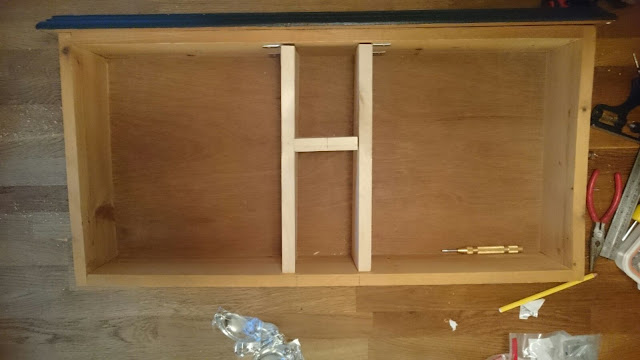
Once it was painted Gavin got to work hacking it up! One evening, when the grandparents had whisked the older two away for a night so we were just left with the smallest, easiest child, he went outside for a couple of hours with a beer and a jigsaw (the tool, not the toy) and afterwards presented me with drawers that had notches cut out to fit the pipework of the sink, saving as much storage space as possible while making it possible to fit the whole thing together.
I didn't do it, but he explained it to me and sent me pictures so obviously I know what I'm talking about.
First he measured the opening he needed to fit the sink fittings on top, then he drilled a hole in each corner of the shape and finished cutting it out with the jigsaw.

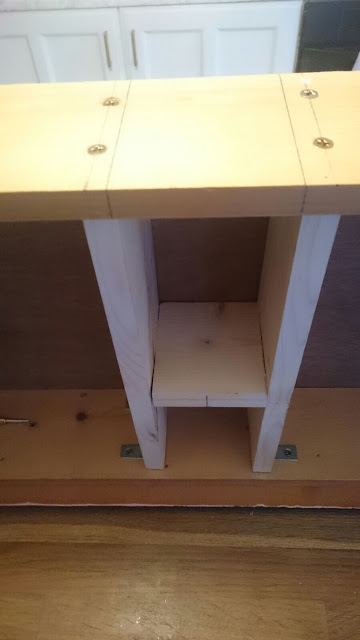
Then he took the drawers, measured and marked the area of each drawer that he would have to remove and then he cut pieces of wood to fit and screwed them into place....

...before then cutting away the section of the drawer that wasn't needed.

Doing it this way meant that the drawer was braced and didn't fall apart when he made the cuts, and it also leaves the most amount of usable storage space possible. He says the first one was by far the most difficult, as he was still figuring out what he was doing. After that it went quickly and he had the whole thing done in a few hours.
Handy as a small pot is my husband.
When the dresser was all ready Gavin turned off the water to that part of the house and then removed the old sink and taps, leaving this....
He then put the dresser in place, sat the sink on top and then threaded the new tap through and fitted it to the water pipes. He also had to fit a new length of pipe to the drain as the old one wasn't long enough.
I'm telling you, give that man a few beers and a wikihow page and he can do just about anything. Just thinking about how much he saved us in plumbers fees makes me all hot and bothered.....but then a child will demand I wipe it's bum or spew on my chest and I'm fine again.
And there it is! With the new mirror and lighting it looks amazing and it's storing all our day to day toiletries.
I love it! I was afraid the table top sink wouldn't be deep enough but it's perfect. I wanted a square one so it would contrast with the round mirror and I love the finished effect. I did toy with the idea of a gold tap, but they were waaaayyyy too expensive in any kind of a modern design, and I figured there's a lot of mixed metal going on in here anyway so the stainless steel is fine.
So there you have it! It was actually much simpler than I thought it would be (say's I, who didn't do any of the hard work!) and I think it's going a really long way to making this room feel more individual and luxurious. And it gives so much storage that I can pack everything away out of sight, making the room much less cluttered and easier to clean, yay!!!

Once it was painted Gavin got to work hacking it up! One evening, when the grandparents had whisked the older two away for a night so we were just left with the smallest, easiest child, he went outside for a couple of hours with a beer and a jigsaw (the tool, not the toy) and afterwards presented me with drawers that had notches cut out to fit the pipework of the sink, saving as much storage space as possible while making it possible to fit the whole thing together.
I didn't do it, but he explained it to me and sent me pictures so obviously I know what I'm talking about.
First he measured the opening he needed to fit the sink fittings on top, then he drilled a hole in each corner of the shape and finished cutting it out with the jigsaw.
 |
| See what I mean about the green tinge to the paint? It's way more noticeable in photo's though, in person it's much more of a flat black. |

Then he took the drawers, measured and marked the area of each drawer that he would have to remove and then he cut pieces of wood to fit and screwed them into place....


Doing it this way meant that the drawer was braced and didn't fall apart when he made the cuts, and it also leaves the most amount of usable storage space possible. He says the first one was by far the most difficult, as he was still figuring out what he was doing. After that it went quickly and he had the whole thing done in a few hours.
Handy as a small pot is my husband.
When the dresser was all ready Gavin turned off the water to that part of the house and then removed the old sink and taps, leaving this....
 |
| It was stinky, and it was filthy. |
He then put the dresser in place, sat the sink on top and then threaded the new tap through and fitted it to the water pipes. He also had to fit a new length of pipe to the drain as the old one wasn't long enough.
I'm telling you, give that man a few beers and a wikihow page and he can do just about anything. Just thinking about how much he saved us in plumbers fees makes me all hot and bothered.....but then a child will demand I wipe it's bum or spew on my chest and I'm fine again.
 |
| That's the new plug on the left, it was €10 on Ebay and it's one you push to open and close. |
And there it is! With the new mirror and lighting it looks amazing and it's storing all our day to day toiletries.
I love it! I was afraid the table top sink wouldn't be deep enough but it's perfect. I wanted a square one so it would contrast with the round mirror and I love the finished effect. I did toy with the idea of a gold tap, but they were waaaayyyy too expensive in any kind of a modern design, and I figured there's a lot of mixed metal going on in here anyway so the stainless steel is fine.
 |
| This is a much better representation of what the colour looks like in person. |
What do you think? Would you ever try something like this? I'd love to see pictures if you did! And if you have any other suggestions for creative storage in a cramped bathroom I'd love to hear it, this one may be nearly finished but I still have the kids bathroom to tackle!
And if you've been following my instagram you'll have seen me working on that pretty amazing (if I do say so myself) stencilled floor you can get a peek of in these photos. I'll be sharing all about that next week so be sure to check back, or even better, subscribe to my email list so you never have to miss a post!
Oh, and if anyone has any tips for taking photos of mirrors without getting your rumpled, sweaty self in them, I'm all ears......
 |
| I thought the mirror was clean. It was not. |

If you liked this post, you might want to check out:


